
Walkthrough: Setting up a VPN

I’ve just gotten to a Starbucks and connected to the wifi. I figured, shoot, why not set up my own VPN on a Digital Ocean droplet that I can use when I’m out and about like this?
OpenVPN vs. Wireguard
Choices, choices… initial research led me to decide between OpenVPN or Wireguard as a VPN option. From what I gathered, here’s a nice pros/cons for each, for my use case.
Use case: One to 2 connected devices; used for passthrough traffic when connected to public networks
| Feature | WireGuard | OpenVPN |
|---|---|---|
| Speed | Much faster | Slightly Slower |
| Security | Uses modern encryption procotols | Highly configurable; can support order encryption protocols |
| Ease | Setup straightforward | More complex, but with much more configuration/customization |
| Battery Use | Low | Higher than Wireguard |
There are a ton of other features for both applications, but I wanted a set it and forget it setup.
Wireguard Install
There are plenty of resources for a no-hassle install of Wireguard, so I’ll keep it pretty short. However, I did have a decision to make: server-side install vs. Docker.
Since this is my personal site, I’ll give my definition of Docker/containerization:
- Docker provides a container containing everything needed for an installation — all dependencies are contained inside a sandboxed package. This allows easy configuration/customization via a config file (
docker-compose.yaml)- This allows us to easily bring the service down/up and ensure that it doesn’t screw with other services on the machine
Now let’s get to installing!
Pre-Reqs
- Docker Install
- I already have Docker installed and configured, and added my user to the docker group. This will allow me to run command such as
docker-composewithout needing sudo. Your config may vary.
- I already have Docker installed and configured, and added my user to the docker group. This will allow me to run command such as
Installing
Creating folder for docker images
- In this case, we’ll create it under the same folder we have our other containers
- Navigate to the docker folder and run:
sudo mkdir wireguard
Create docker-compose file
- The Official Github Readme will show you the format for a
docker-compose.yamlfile - We’ll create our own and add it into our newly created directory
Setup Packet Forwarding
-
If we ran this now, we’d reach a brick wall at our server. Our requests will make it there but they won’t be forwarded to the system’s network interface!
-
We need to permanently add this configuration to be enforced on startup. We do this using the Kernel system variables configuration files, located at
/etc/sysctl.d- NOTE: If you have nothing else running on your server, this will be fine. However, this enables network traffic forwarding from any and all interfaces. That being said, firewall rules ultimately dictate what can actually get forwarded.
-
The readme states:
Files found under the /etc/sysctl.d directory that end with .conf are parsed within sysctl(8) at boot time. If you want to set kernel variables you can either edit /etc/sysctl.conf or make a new file.
-
To do this, we’ll run:
echo "net.ipv4.ip_forward=1" | sudo tee /etc/sysctl.d/99-wireguard.conf -
Fun fact: My original thought process said “why can’t we just redirect to the conf file using
>? Well, each side of the>gets run by the active user → root via sudo doesn’t apply to the writing of the config file and will fail! -
Finally, we’ll reload the system variables:
sudo sysctl --system- This confirms we’ve loaded the variable
Setup firewall rules
We have one last step before we start our docker contained, and that is to enable our firewall rules. I am using ufw on my system. Run the following and ensure ports match your docker-compose config:
sudo ufw allow 51820/udp
sudo ufw reload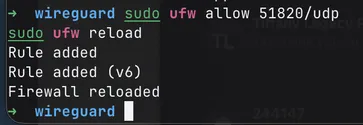
Starting the Container
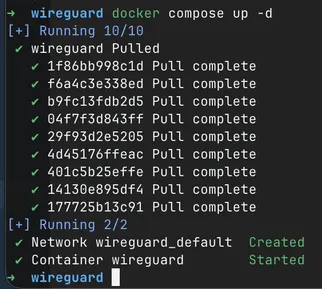
We’ll simply start the container! Ensure you are in the correct directory, and run docker compose up -d
- This will start the container in detached mode, meaning it’ll free up your command line and run in the background
Since this is my first time running this command, Docker will pull all of the required files and start the container (assuming it’s configured correctly 🤞)
Grab Config and Test Connection
At this point, Wireguard should be up and running! Next step is to get it up and running on your device.
Note: our docker-compose file specified 5 peers, meaning that we basically enabled access for 5 different devices. It is recommended to use a different configuration per-device to ensure that packets are routed to the correct device. If I share a configuration between my laptop and my phone, both devices will receive the same IP on the server and packets may get lost or served incorrectly.
- Install Wireguard on your devices via the App Store (or however you’d like)
Pull your config files from your server. I’m actually going to rename my peer folders so that I remember which is which in the future:

Each folder contains a config file. Use cat to get the contents and copy it into a configuration file to share, or create a new empty configuration on the Wireguard UI (Mac):
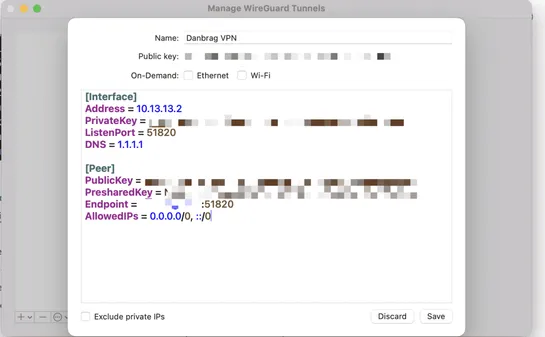
Once you click save, you’ll have to allow Wireguard to add VPN Configurations:
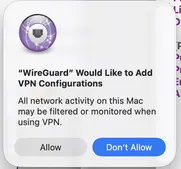
The final step is to click ‘activate’ and let it connect!
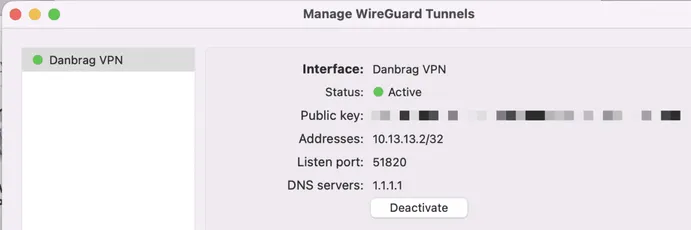
For my Phone, I have two options: copy configuration into a file and send it to my phone, or generate a QR code. Luckily for us, Wireguard generates a QR code for us on initialization, saving it as peerX.png in the configuration directory.
I downloaded it to my computer quickly via scp and was able to import it by scanning it via the Wireguard app!
scp user@host:/path/to/wireguard/config/dan-iphone/peer2.png ~/Downloads/peer2.pngThe iPhone app will allow require you to allow Wireguard to add network configurations. One click and one password later, we are up and running!
Verifying
Let’s ensure our IP now reflects our VPS IP.
The easiest way, and with less ads, is to run curl ifconfig.me. This returns your IP address. Let’s test it out on my laptop. I’ll run that command before, and after enabling:
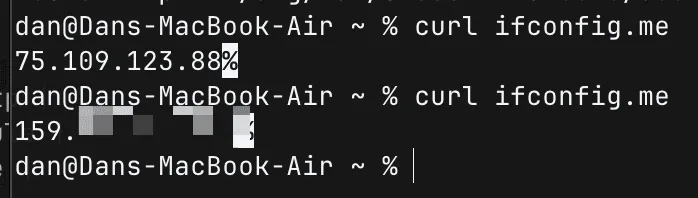
Looks like we’re in business!
Speedtest
I’m currently using a public Starbucks Wi-Fi, so let’s see how my VPS handles a speed test. I’m also concerned about system usage as my VPS is the cheapest one out there.
Running htop alongside the speed test.
Without VPN
Let’s get a baseline of how fast this public Wifi is.
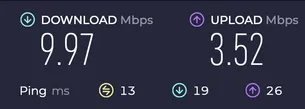
Not too great…
With VPN
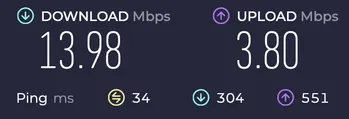
Not what I expected! An improvement, somehow. htop also proved fruitful, with no significant CPU or memory load.
Conclusion
Well, that was a fun afternoon project. Figured I’d learn the process for setting up a VPN and dive deep into answering any questions I didn’t know about.
Wireguard is super easy to set up, especially with a Docker container!
A Few More Thoughts
So, running the VPN has been relatively smooth except for a couple of hiccups. Mainly, I learned that VPS droplets are NOT well liked by Financial Services applications and WAFs around the world. Since I’m going through a Digital Ocean droplet, they are flagged for potential spam. Sometimes it’s an extra CAPTCHA, but sometimes access is just denied.
Easy enough to fix – just toggle the VPN off for that transaction and continue as normal. Those types of interactions are encrypted via HTTPS by default, so I’m not too worried about people knowing where I’m visiting.